Event Loop in Node.js: Managing Asynchronous Operations
Node.js is known for its non-blocking, asynchronous nature, and the event loop lies at the heart of this behavior. It ensures that the main thread remains unblocked, allowing multiple operations to run efficiently without waiting for each other to finish. In this article, we’ll explore how the event loop works, break down its six phases, and discuss strategies to prevent blocking it.
Understanding the Event Loop in Node.js
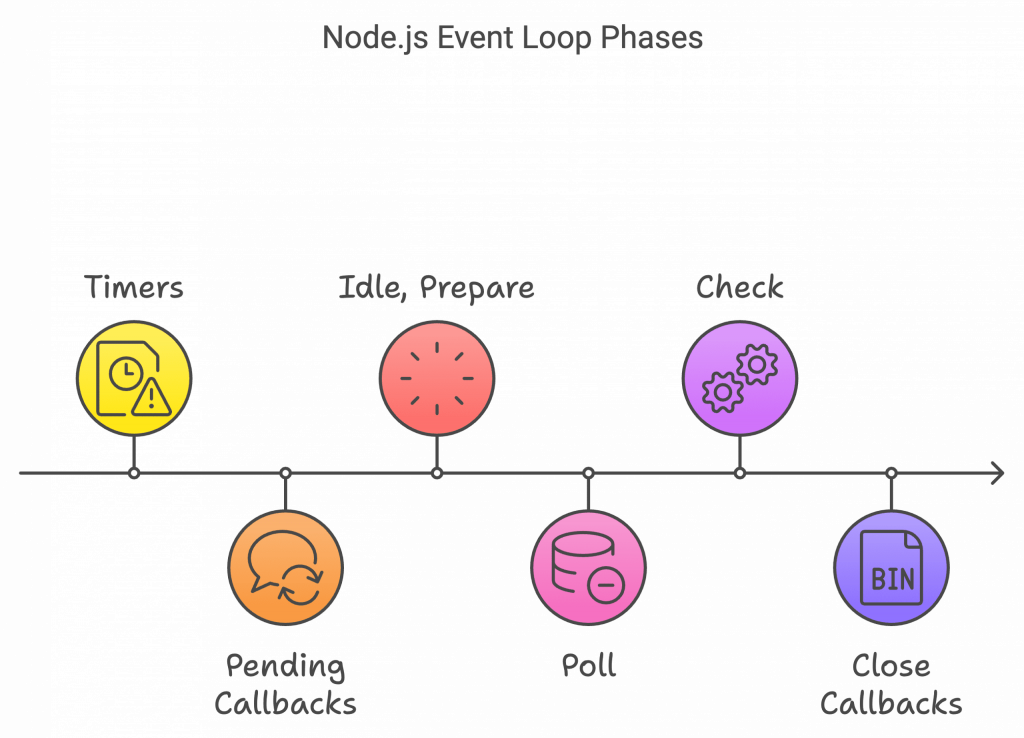
The event loop in Node.js enables asynchronous processing, avoiding the blocking of the main thread. It operates in six phases:

Understanding the Event Loop in Node.js
The event loop is a mechanism responsible for handling asynchronous operations. Whenever an operation like I/O or a timer completes, the event loop determines when the callback for that operation should run. This design allows Node.js to process multiple requests without blocking the main thread, ensuring high performance in applications.
The Six Phases of the Event Loop
The event loop operates in a cyclical manner, passing through six distinct phases. Each phase has a specific purpose, and callbacks are executed accordingly.
1. Timers Phase
This phase executes callbacks scheduled by setTimeout and setInterval. If the time delay specified has expired, the associated callback runs here.
Example:
setTimeout(() => {
  console.log('Executed after 1 second.');
}, 1000);
console.log('Timer scheduled.');
Output:
Timer scheduled.
Executed after 1 second.
Even though the delay is 1000 ms, setTimeout runs after the current event loop tick completes.
Example for setInterval
let count = 0;
const intervalId = setInterval(() => {
  console.log(`Interval executed: ${++count}`);
  if (count === 3) clearInterval(intervalId);
}, 500);
2. Pending Callbacks Phase
In this phase, the event loop processes I/O callbacks that were deferred from the previous cycle. These callbacks handle errors and non-blocking I/O operations.
Example:
const fs = require('fs');
fs.readFile('file.txt', (err, data) => {
  if (err) console.error(err);
  else console.log(data.toString());
});Output:
Read operation scheduled.
File content: <contents of example.txt>
3. Idle, Prepare Phase
This phase is used internally by Node.js to prepare the system for the next round of polling. You won’t directly interact with this phase, but we can simulate some behavior related to it by focusing on tasks like internal polling setup.
Example with TCP Server Setup (Prepare State)
const net = require('net');
const server = net.createServer((socket) => {
  socket.end('Connection closed.');
});

server.listen(8080, () => {
  console.log('Server listening on port 8080.');
});
The prepare phase initializes this server. Once prepared, it moves to the poll phase waiting for incoming connections.
4. Poll Phase
During the poll phase, the event loop waits for new I/O events and executes the relevant callbacks. If no events are pending, it will stay in this phase until a new event occurs or a timer is ready to execute.
const http = require('http');

const server = http.createServer((req, res) => {
  res.end('Hello from server!');
});

server.listen(3000, () => {
  console.log('Server running on http://localhost:3000');
});
Here, the server enters the poll phase waiting for HTTP requests. When a request arrives, its callback is executed, sending a response.
5. Check Phase
The check phase runs callbacks scheduled with setImmediate. These callbacks are executed after the poll phase, regardless of whether there are pending I/O operations.
Example:
setImmediate(() => {
  console.log('Executed in check phase.');
});

setTimeout(() => {
  console.log('Executed in timers phase.');
}, 0);

console.log('Main code executed.');Output:
Main code executed.
Executed in check phase.
Executed in timers phase.
6. Close Callbacks Phase
This phase handles cleanup operations. For example, callbacks associated with closing network connections, such as socket.on(‘close’), are executed here.
const net = require('net');
const server = net.createServer((socket) => {
  socket.on('close', () => {
    console.log('Socket closed.');
  });
  socket.end('Closing connection.');
});

server.listen(4000, () => {
  console.log('Server listening on port 4000.');
});Output:
Server listening on port 4000.
Socket closed.
When the client disconnects, the socket.on(‘close’) callback is executed in the close callbacks phase.
Blocking the Event Loop
While the event loop is designed to manage asynchronous operations efficiently, blocking the loop can degrade performance. If the main thread gets stuck with heavy computation or synchronous operations, it prevents other callbacks from being executed. This can cause delays and make your application unresponsive.
When you perform CPU-intensive tasks (like large computations) on the main thread, it blocks the event loop. Here’s how you can use Worker Threads to prevent blocking.
Example of Blocking the Event Loop
function blockingTask() {
  const start = Date.now();
  while (Date.now() - start < 5000) {} // Block the loop for 5 seconds.
  console.log('Blocking task finished.');
}

console.log('Main code executed.');
blockingTask();
console.log('This runs after the blocking task.');
Output:
Main code executed.
Blocking task finished.
This runs after the blocking task.
In this example, nothing else can run during the 5-second blocking period, making the application unresponsive.
Solution: Using Worker Threads
const { Worker } = require('worker_threads');

const worker = new Worker(`
  const { parentPort } = require('worker_threads');
  let sum = 0;
  for (let i = 0; i < 1e9; i++) sum += i;
  parentPort.postMessage(sum);
`, { eval: true });

worker.on('message', (result) => {
  console.log('Result from worker:', result);
});

console.log('Main code executed.');Output:
Main code executed.
Result from worker: 499999999500000000
Here, the blocking computation runs in a separate thread, leaving the event loop free to handle other tasks.
How to Avoid Blocking the Event Loop
• Use Worker Threads for CPU-intensive tasks:
Node.js provides the Worker Threads module to handle tasks like image processing, encryption, or complex calculations. This allows heavy operations to run in parallel, offloading work from the event loop.
Take a look at this article to setup workers in Node.js.
Example of a worker thread:
const { Worker } = require('worker_threads');

const worker = new Worker('./heavyTask.js');
worker.on('message', (result) => {
  console.log(`Result: ${result}`);
});
• Break Large Tasks into Smaller Chunks:
Use asynchronous functions or setImmediate to divide a large task into smaller, non-blocking operations.
Example:
function processLargeArray(arr) {
if (arr.length === 0) return;
console.log(arr.shift());
setImmediate(() => processLargeArray(arr));
}

processLargeArray([1, 2, 3, 4, 5]);
Conclusion
The event loop is a core component of Node.js, responsible for managing asynchronous operations efficiently. By understanding its six phases—Timers, Pending Callbacks, Idle & Prepare, Poll, Check, and Close Callbacks—developers can write non-blocking code that performs smoothly. However, it’s crucial to avoid blocking the event loop with heavy computations. Leveraging tools like Worker Threads ensures that your application remains fast and responsive. Mastering the event loop will empower you to build scalable and high-performing Node.js applications.


